
Libraries
59 files
-

ReactTS using NextUI and TailwindCSS template
By -Andreas
Template for ReactTS using NextUI and TailwindCSS
This project serves as a template for getting started with React on your RageMP server. It is using TypeScript, and comes with NextUI providing all necessary building blocks and TailwindCSS for additional styling. The idea is to have one UI project containing everything you need, with modals that can be toggled on demand.
I was struggling with getting what I needed from Vue, and decided to scrap that idea and went forward with React. I hope this will save others some time if you should choose the same. After browsing the forum a bit and seeing some of the valuable examples already existing for user interfaces, they didn't quite get me where I needed. So this is my take using, a globally exposed function invokeEvent that can be used to show, hide and toggle modals. This allows for as many modals to be displayed at the same time as you would like. I do want to mention https://rage.mp/forums/topic/2571-guide-creating-ui-with-react/ for having the idea of an EventManager to get the bridge between RageMP and the React instance. Though it is meant for JavaScript it was helpful to get things rolling.
Build
Run npm run build and grab the dist folder and put it inside your server client packages.
Client events
After instantiating your browser it will support three functions for toggling modals on demand. The template contains a login example, so invoking trigger('show', 'login'); will enable the login modal etc. More modals can easily be created by following the structure as seen in the code.
let browser = mp.browsers.new("http://package/gamemode/cef/index.html"); mp.events.add('ShowModal::Client', (modal) => { browser.execute(`invokeEvent('show', '${modal}');`); }); mp.events.add('ToggleModal::Client', (modal) => { browser.execute(`invokeEvent('toggle', '${modal}');`); }); mp.events.add('HideModal::Client', (modal) => { browser.execute(`invokeEvent('hide', '${modal}');`); });
Check out my GTARoleplay gamemode where this resource is actively being used.
Read more about it here: https://www.patreon.com/c/ragemprp
GitHub repository link
https://github.com/Andreas1331/ragemp-roleplay-ui
333 downloads
(0 reviews)0 comments
Updated
-

Iris: An Interaction Library
By rootcause
Iris is a raycast based interaction system with two components: the core library and a basic interaction UI which can be reimplemented by server developers to fit their needs, making it highly customizable.
Installing
Put the files you downloaded in their respective places Add require("iris") to client_packages/index.js (Optional) Add require("iris-ui") to client_packages/index.js or build your own UI to handle interactions with
Clientside API
The library defines a global object named Iris that can be used to interact with the library. Here are its members:
Constants
The Iris global object has a property called SearchType which acts as an enum to avoid magic values in code:
Iris.SearchType.Invalid // 0 Iris.SearchType.EntityType // 1 Iris.SearchType.EntityModel // 2 Iris.SearchType.EntityHandle // 3 Iris.SearchType.NumSearchTypes // 4
Functions
/** * Creates an interaction. * @param {number} searchType * @param {number} target * @param {object} interaction Must have a `name` property. `order` (number) is also an optional property to display the interaction above/below other interactions. * @returns {number} The interaction ID which can be used with `getInteraction` and `removeInteraction` functions. */ Iris.createInteraction(searchType, target, interaction); /** * Returns the interaction with the specified ID. * @param {number} interactionId * @returns {object|undefined} The interaction object if found, `undefined` otherwise. */ Iris.getInteraction(interactionId); /** * Removes the interaction with the specified ID. * @param {number} interactionId * @returns {boolean} `true` if the removal is successful, `false` otherwise. */ Iris.removeInteraction(interactionId); /** * Returns whether the library is scanning for interactions or not. * @returns {boolean} */ Iris.isActive(); /** * Sets the interaction scanning status of the library. * @fires `iris::stateChange` clientside event with the first argument being the new scanning status. * @param {boolean} value */ Iris.setActive(value); /** * Returns the distance used for the interaction scanning raycast. * @returns {number} */ Iris.getRaycastDistance(); /** * Sets the distance used for the interaction scanning raycast. * @param {number} newDistance */ Iris.setRaycastDistance(newDistance); /** * Returns the flags used for the interaction scanning raycast. Refer to: https://wiki.rage.mp/index.php?title=Raycasting::testPointToPoint * @returns {number} */ Iris.getRaycastFlags(); /** * Sets the flags used for the interaction scanning raycast. Refer to: https://wiki.rage.mp/index.php?title=Raycasting::testPointToPoint * @param {number} newFlags */ Iris.setRaycastFlags(newFlags); /** * Returns the handle of the last entity that was hit by the interaction scanning raycast. * @returns {number} */ Iris.getLastEntityHandle();
Events
The library uses RAGEMP's clientside events.
/** * iris::stateChange is called when scanning for interactions is enabled/disabled. * @param {boolean} newState `true` if scanning, `false` otherwise. */ mp.events.add("iris::stateChange", function(newState) { // your code here }); /** * iris::focusChange is called when the entity detected by the interaction scanner changes. * @param {object} focusChangeContext * @param {number} focusChangeContext.newEntityHandle * @param {number} focusChangeContext.oldEntityHandle * @param {number|undefined} focusChangeContext.newEntityType * @param {number|undefined} focusChangeContext.newEntityModel * @param {object[]|undefined} focusChangeContext.interactions The available interactions for the new entity. * @param {object|undefined} focusChangeContext.raycastResult The raycast result that was responsible for calling this event, set only if the `focusChangeContext.newEntityHandle` is valid. Refer to: https://wiki.rage.mp/index.php?title=Raycasting::testPointToPoint */ mp.events.add("iris::focusChange", function(focusChangeContext) { // your code here });
Example Script
// https://wiki.rage.mp/index.php?title=Entity::getType const ENTITY_TYPE_VEHICLE = 2; const ENTITY_TYPE_OBJECT = 3; // Create some interactions // "eventName" and "selectedFn" properties only work with the default iris-ui script, they're intended to show two simple ways to handle interactions. const myVehicleInteraction = Iris.createInteraction(Iris.SearchType.EntityType, ENTITY_TYPE_VEHICLE, { name: "Generic vehicle interaction (get remoteId)", eventName: "my_custom_event_name" }); const myObjectInteraction = Iris.createInteraction(Iris.SearchType.EntityType, ENTITY_TYPE_OBJECT, { name: "Generic object interaction (get handle)", selectedFn: function(entityHandle) { mp.gui.chat.push(`This object's handle is: ${entityHandle}`); } }); const adderOnlyInteraction = Iris.createInteraction(Iris.SearchType.EntityModel, mp.game.joaat("adder"), { name: "Adder only interaction", eventName: "adder_option_clicked", order: 99 // make it the top option }); // Liquor store example (non-functional) const mp_m_shopkeep_01 = mp.game.joaat("mp_m_shopkeep_01"); mp.peds.new(mp_m_shopkeep_01, new mp.Vector3(-2966.05, 391.43, 15.05), 90.0, 0); // Options for the shopkeeper Iris.createInteraction(Iris.SearchType.EntityModel, mp_m_shopkeep_01, { name: "Ask about his day"}); Iris.createInteraction(Iris.SearchType.EntityModel, mp_m_shopkeep_01, { name: "Pay for items" }); Iris.createInteraction(Iris.SearchType.EntityModel, mp_m_shopkeep_01, { name: "Threaten" }); // Options for various items inside the store Iris.createInteraction(Iris.SearchType.EntityModel, mp.game.joaat("v_ret_ml_sweetego"), { name: "Add EgoChaser to cart ($5)" }); Iris.createInteraction(Iris.SearchType.EntityModel, mp.game.joaat("v_ret_ml_sweet4"), { name: "Add Sweet Nothings to cart ($2)" }); Iris.createInteraction(Iris.SearchType.EntityModel, mp.game.joaat("v_ret_ml_sweet3"), { name: "Add P's & Q's to cart ($1)" }); Iris.createInteraction(Iris.SearchType.EntityModel, mp.game.joaat("v_ret_ml_beeram"), { name: "Add A. M. Beer (6-pack) to cart ($12)" }); Iris.createInteraction(Iris.SearchType.EntityModel, mp.game.joaat("v_ret_ml_beerdus"), { name: "Add Dusche Gold (6-pack) to cart ($14)" }) // Event handlers function handleGetVehicleRemoteId(entityHandle) { const vehicle = mp.vehicles.atHandle(entityHandle); if (vehicle) { mp.gui.chat.push(`This vehicle's remoteId is: ${vehicle.remoteId}`); } } function handleAdderClick() { mp.gui.chat.push("You found the adder exclusive interaction... aaand it's gone."); Iris.removeInteraction(adderOnlyInteraction); Iris.setActive(false); } // Register event handlers mp.events.add({ "my_custom_event_name": handleGetVehicleRemoteId, "adder_option_clicked": handleAdderClick });
Source code is also available on GitHub: https://github.com/root-cause/ragemp-iris
192 downloads
(3 reviews)0 comments
Updated
-

Headblend Palette Color Sync
By rootcause
This resource adds serverside API to set head blend palette colors. Head blend palette colors are used for crew colored clothing in GTA Online. (example here)
Installing
Put the files you downloaded in their respective places Add require('palette-sync') to client_packages/index.js All done
API (Serverside)
This resource adds 4 functions to the mp.Player prototype:
/** * Sets the specified head blend palette color for the player. **Make sure `player.setCustomization` is called beforehand to avoid issues.** * @param {number} paletteIndex * @param {number} red * @param {number} green * @param {number} blue * @throws If `paletteIndex` is less than 0 or higher than 3. * @throws If `red`, `green` or `blue` is not an integer between 0 to 255. */ player.setHeadBlendPaletteColor(paletteIndex, red, green, blue); /** * Sets the head blend palette colors for the player. This function should be used to update multiple palette colors at once. **Make sure `player.setCustomization` is called beforehand to avoid issues.** * @param {Array<[number, number, number, number]>} colors 2-dimensional array where each element has palette index, red, green and blue color data such as `[[0, 255, 0, 0], [3, 0, 255, 0]]`. * @throws If `colors` is not an array. * @throws If any `paletteIndex` is less than 0 or higher than 3. * @throws If any `red`, `green` or `blue` is not an integer between 0 to 255. */ player.setHeadBlendPaletteColors(colors); /** * Returns the specified head blend palette color for the player. * @param {number} paletteIndex * @throws If `paletteIndex` is less than 0 or higher than 3. * @returns {Object} An object with `red`, `green` and `blue` properties, ranging from 0 to 255. */ player.getHeadBlendPaletteColor(paletteIndex); /** * Returns the head blend palette colors for the player. * @returns {Array<Object>} An array of objects where each element has `red`, `green` and `blue` properties, ranging from 0 to 255. */ player.getHeadBlendPaletteColors();
Example (Serverside)
// EXAMPLE: Getting a specific color of the player mp.events.addCommand("mycolor", (player, _, index) => { index = Number(index); const paletteColor = player.getHeadBlendPaletteColor(index); player.outputChatBox(`paletteIndex #${index} - red: ${paletteColor.red}, green: ${paletteColor.green}, blue: ${paletteColor.blue}`); }); // EXAMPLE: Getting all colors of the player mp.events.addCommand("mycolors", (player) => { const paletteColors = player.getHeadBlendPaletteColors(); paletteColors.forEach((item, index) => { player.outputChatBox(`paletteIndex #${index} - red: ${item.red}, green: ${item.green}, blue: ${item.blue}`); }); }); // EXAMPLE: Setting one color mp.events.addCommand("setcolor", (player, _, index, r, g, b) => { index = Number(index); r = Number(r); g = Number(g); b = Number(b); player.setHeadBlendPaletteColor(index, r, g, b); }); // EXAMPLE: Setting multiple colors at once mp.events.addCommand("randomcolors", (player) => { let data = []; // the game has 4 palette colors for (let i = 0; i < 4; i++) { data.push([ i, // palette index Math.floor(Math.random() * 256), // random red Math.floor(Math.random() * 256), // random green Math.floor(Math.random() * 256), // random blue ]); } player.setHeadBlendPaletteColors(data); });
Notes
The game doesn't seem to like it when you set palette color(s) of a ped that doesn't have headblend data, it's recommended that you do color changes after using Player::setCustomization Crew t-shirt palette indices: 0 - sleeve color, 1 - no difference, 2 - collar color, 3 - main color Crew jacket palette indices: 0, 1, 2 - no difference, 3 - main color
Source code is also available on GitHub: https://github.com/root-cause/ragemp-palette-sync
31 downloads
(1 review)0 comments
Updated
-
Timer Bars 2
By rootcause
Timer Bars 2 is a complete rewrite of my old Timer Bars resource. It's not backwards compatible, meaning you'll need to update your existing timerbar code if you want to switch to this resource.
Changes
Now requires RAGE Multiplayer 1.1.0 and above Now using offsets, sizes and logic from alexguirre's RAGENativeUI. It really is a great project and deserves some GitHub stars, check it out. OOP approach Probably a bit more efficient Definitely more pleasing to look at
Clientside API
You can access the API by loading timerbars into a variable:
const timerBarPool = require("timerbars");
timerbars/index.js exports these functions:
// Adds timerbars into the internal timerbar pool. Values sent to this function must be an instance of TimerBarBase or they'll be ignored. add(...args); // Returns whether the internal timerbar pool has specified timerbar. has(timerBar); // Removes the specified timerbar from the internal timerbar pool. If you added the same timerbar multiple times, you'll need to use this function multiple times. remove(timerBar); // Empties the internal timerbar pool. clear();
Timer Bars
TimerBarBase
This is the base class for other timer bar classes, not really useful on its own since it just draws the title and background. You can inherit from this class to implement your own timer bar designs.
/* Constructor */ new TimerBarBase(title); /* Properties */ // Title (left text) of the timer bar. Accepts and returns a string. title // Color of the timer bar's title. Accepts HUD color IDs or RGBA array, returns RGBA array. titleColor // Highlight color of the timer bar. Accepts HUD color IDs or RGBA array. Returns null if a highlight color isn't set and RGBA array otherwise. highlightColor /* Functions */ // Calls mp.game.gxt.reset on the internal GXT entries. Should be used if you're going to stop using a timer bar completely. resetGxt()
TextTimerBar
This is the timer bar with a title and a text.
/* Constructor */ new TextTimerBar(title, text); /* Properties */ // Inherited from TimerBarBase title titleColor highlightColor // Label (right text) of the timer bar. Accepts and returns a string. text // Color of the timer bar's label. Accepts HUD color IDs or RGBA array, returns RGBA array. textColor // Color of the timer bar's label and title, accepts HUD color IDs or RGBA array. No return value since it's just a setter. color /* Functions */ // Inherited from TimerBarBase resetGxt()
PlayerTimerBar
This is the timer bar with a title and a text, except the title is styled to be like GTA Online's player name display.
/* Constructor */ new PlayerTimerBar(title, text); /* Properties */ // Inherited from TimerBarBase title titleColor highlightColor // Inherited from TextTimerBar text textColor color /* Functions */ // Inherited from TimerBarBase resetGxt()
BarTimerBar
This is the timer bar with a title and a progress bar.
/* Constructor */ new BarTimerBar(title, progress); /* Properties */ // Inherited from TimerBarBase title titleColor highlightColor // Progress of the timer bar. Accepts and returns a number between 0.0 and 1.0. progress // Background color of the progress bar. Accepts HUD color IDs or RGBA array, returns RGBA array. backgroundColor // Foreground color of the progress bar. Accepts HUD color IDs or RGBA array, returns RGBA array. foregroundColor /* Functions */ // Inherited from TimerBarBase resetGxt()
CheckpointTimerBar
This is the timer bar with a title and a bunch of circles.
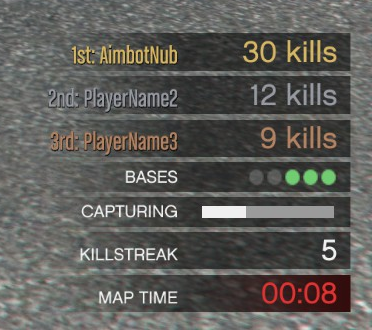
/* Constructor */ new CheckpointTimerBar(title, numCheckpoints); /* Static properties */ CheckpointTimerBar.state = { inProgress: 0, completed: 1, failed: 2 }; /* Properties */ // Inherited from TimerBarBase title titleColor highlightColor // The amount of checkpoints of the timer bar. Read only, returns a number. numCheckpoints // Color of the checkpoints with the state "completed". Accepts HUD color IDs or RGBA array, returns RGBA array. color // Color of the checkpoints with the state "inProgress". Accepts HUD color IDs or RGBA array, returns RGBA array. inProgressColor // Color of the checkpoints with the state "failed". Accepts HUD color IDs or RGBA array, returns RGBA array. failedColor /* Functions */ // Inherited from TimerBarBase resetGxt() // Sets a specified checkpoint's state, checkpoint indices start from 0 and go up to numCheckpoints - 1. Refer to static properties section for newState values. setCheckpointState(index, newState); // Sets all checkpoints state of the timer bar. Refer to static properties section for newState values. setAllCheckpointsState(newState); Check the wiki for HUD colors: https://wiki.rage.mp/index.php?title=Fonts_and_Colors#HUD_Colors
Example
Creating the timerbars in the screenshot:
const timerBarPool = require("timerbars"); const TextTimerBar = require("timerbars/classes/TextTimerBar"); const PlayerTimerBar = require("timerbars/classes/PlayerTimerBar"); const BarTimerBar = require("timerbars/classes/BarTimerBar"); const CheckpointTimerBar = require("timerbars/classes/CheckpointTimerBar"); // Set up text bars const mapTimeBar = new TextTimerBar("MAP TIME", "00:08"); mapTimeBar.textColor = [224, 50, 50, 255]; // or 6 (HUD_COLOUR_RED) mapTimeBar.highlightColor = 8; // HUD_COLOUR_REDDARK const ksBar = new TextTimerBar("KILLSTREAK", "5"); // Set up progress bar const progressBar = new BarTimerBar("CAPTURING", 0.33); // Set up checkpoint bar const checkpointBar = new CheckpointTimerBar("BASES", 5); checkpointBar.color = 18; // HUD_COLOUR_GREEN, or [114, 204, 114, 255] for (let i = 0; i < 3; i++) { checkpointBar.setCheckpointState(i, CheckpointTimerBar.state.completed); } // Set up player bars const playerBars = [ new PlayerTimerBar("3rd: PlayerName3", "9 kills"), new PlayerTimerBar("2nd: PlayerName2", "12 kills"), new PlayerTimerBar("1st: AimbotNub", "30 kills") ]; playerBars.forEach((bar, index) => { bar.color = 107 + index; }); // Bars won't be drawn until they are in the timerBarPool, so press F6 to add them mp.keys.bind(0x75 /* F6 */, false, () => { timerBarPool.add(mapTimeBar, ksBar, progressBar, checkpointBar, ...playerBars); }); // ...and press F7 to clear the timerBarPool (or remove them individually with the timerBarPool.remove function) mp.keys.bind(0x76 /* F7 */, false, () => { timerBarPool.clear(); }); // Pressing F8 toggles a loading prompt, which makes the timerbars go up a bit mp.keys.bind(0x77 /* F8 */, false, () => { mp.game.gxt.set("TB_TEST_LOADING", "Preparing next map..."); if (!mp.game.invoke("0xD422FCC5F239A915") /* BUSYSPINNER_IS_ON */) { mp.game.ui.setLoadingPromptTextEntry("TB_TEST_LOADING"); mp.game.ui.showLoadingPrompt(1); } else { mp.game.invoke("0x10D373323E5B9C0D" /* BUSYSPINNER_OFF */); } }); Source code is available on GitHub in case you don't want to download: https://github.com/root-cause/ragemp-timerbars
378 downloads
-

Blip Info API
By rootcause
This resource adds the blip information feature that exists for (mainly) adversary modes in GTA Online.
Installing
Put the files you downloaded in their respective places Add require('blip-info') to client_packages/index.js All done
API (Clientside)
This library extends the mp.Blip prototype so these functions are available for every blip created using mp.blips.new.
/** * Attaches data to the blip. * It's recommended that you use the BlipInfoBuilder class that comes with the library to build the info object. */ blipMp.setInfo(infoObject); /** * Removes the data attached to the blip. */ blipMp.resetInfo(); BlipInfoBuilder isn't documented here but it has JSDoc comments, the example script shows how it can be used as well.
Example Script
const BlipInfoBuilder = require("./blip-info/BlipInfoBuilder"); // example blip data const garageData = [ { name: "Garage: 0120 Murrieta Heights", description: "With good access to the major roadways in and out of Los Santos, this spacious garage is perfect for the man or woman who might need to leave town in a hurry. Or is obsessed with cars.", position: new mp.Vector3(963.4199, -1022.1301, 39.8475), textureDict: "dyn_mp_24", textureName: "dyn_mp_24", slots: 10, price: 150000 }, { name: "Garage: Unit 14 Popular St", description: "If you're an individual who likes to keep their business private, look no further than this secluded garage in East Los Santos.", position: new mp.Vector3(895.9359, -888.7846, 26.2485), textureDict: "dyn_mp_25", textureName: "dyn_mp_25", slots: 6, price: 77500 }, { name: "Garage: Unit 2 Popular St", description: "Spacious garage in prime East Los Santos. Panoramic views of urban blight, walking distance to gang members.", position: new mp.Vector3(817.4532, -924.8551, 25.2430), textureDict: "dyn_mp_26", textureName: "dyn_mp_26", slots: 10, price: 142500 }, { name: "Garage: 331 Supply St", description: "Newly renovated garage with excellent square footage and direct road access. What better place to keep brand-new vehicles than the neighborhood with the highest crime rate in Los Santos?", position: new mp.Vector3(759.2387, -755.3151, 25.9151), textureDict: "dyn_mp_27", textureName: "dyn_mp_27", slots: 10, price: 135000 }, { name: "Garage: Unit 1 Olympic Fwy", description: "A good-sized garage in a quiet location within walking distance of the train for those days when you feel extra guilty about your 6-car carbon footprint.", position: new mp.Vector3(842.1298, -1165.0754, 24.3046), textureDict: "dyn_mp_28", textureName: "dyn_mp_28", slots: 6, price: 70000 }, { name: "Garage: 0754 Roy Lowenstein Blvd", description: "Located just a few brain-melting steps away from an electrical substation, you'll never have to worry losing power or reaching old age again at this garage in East Los Santos.", position: new mp.Vector3(528.8805, -1603.0293, 28.3225), textureDict: "dyn_mp_29", textureName: "dyn_mp_29", slots: 2, price: 29500 }, { name: "Garage: 12 Little Bighorn Ave", description: "Affluent on the inside, effluent on the outside! This garage offers panoramic views of the Los Santos waterways.", position: new mp.Vector3(569.9441, -1570.2930, 27.5777), textureDict: "dyn_mp_30", textureName: "dyn_mp_30", slots: 2, price: 32000 }, { name: "Garage: Unit 124 Popular St", description: "Calling all bargain hunters! In today's economy, it's all about desirable properties in undesirable areas. East Los Santos? We prefer to call it 'South of Vinewood'! Plus if the economy keeps tanking, you can go live in it!", position: new mp.Vector3(727.7570, -1189.8367, 23.2765), textureDict: "dyn_mp_31", textureName: "dyn_mp_31", slots: 2, price: 25000 } ]; const seaRaceData = [ { name: "Los Santos Port", position: new mp.Vector3(621.7491, -2136.7981, 0.0), textureDict: "spsearaces", textureName: "lossantos", recordTime: "01:23.456", recordHolder: "sea_racing_pro" }, { name: "El Gordo", position: new mp.Vector3(3447.7471, 5192.9956, 0.0), textureDict: "spsearaces", textureName: "southcoast", recordTime: "00:00.123", recordHolder: "speed0fl1ght" }, // lets say this one doesn't have a record yet { name: "Power Station", position: new mp.Vector3(3063.1135, 639.8550, 0.0), textureDict: "spsearaces", textureName: "northcoast" }, // this one doesn't have a record yet as well and has a cash bonus { name: "Lago Zancudo", position: new mp.Vector3(198.1107, 3620.3972, 27.3487), textureDict: "spsearaces", textureName: "canyon", cashMultiplier: 2.5 } ]; // event handlers function onLocalPlayerReady() { // example 1: garage blips for (const garage of garageData) { // request the texture dict mp.game.graphics.requestStreamedTextureDict(garage.textureDict, false); // create the blip garage.blip = mp.blips.new(369, garage.position, { shortRange: true }); // set garage info (using plain object) garage.blip.setInfo({ // header title: garage.name, textureDict: garage.textureDict, textureName: garage.textureName, // data components: [ { type: 0, title: "Capacity", value: `${garage.slots} vehicles` }, { type: 0, title: "Price", value: `~g~$${garage.price}` }, { type: 4 }, { type: 5, value: garage.description } ] }); // with BlipInfoBuilder it'd look like this: /* const info = new BlipInfoBuilder() .setTitle(garage.name) .setTexture(garage.textureDict, garage.textureName) .addComponent("Capacity", `${garage.slots} vehicles`) .addComponent("Price", `~g~$${garage.price}`) .addDividerComponent() .addDescriptionComponent(garage.description) .build(); garage.blip.setInfo(info); */ } // example 2: sea races mp.game.graphics.requestStreamedTextureDict("spsearaces", false); for (const race of seaRaceData) { // create the blip race.blip = mp.blips.new(316, race.position, { shortRange: true }); // set race info (using BlipInfoBuilder) const info = new BlipInfoBuilder() .setTitle(race.name) .setTexture(race.textureDict, race.textureName) .addComponentWithIcon("Type", "Sea Race", 13, 1, false); if (race.cashMultiplier) { info.setCashText(`${race.cashMultiplier}x`); } if (race.recordHolder && race.recordTime) { info.addComponentWithPlayerName("Record Holder", race.recordHolder); info.addComponent("Record Time", race.recordTime); } race.blip.setInfo(info.build()); } } function onLocalPlayerQuit(player) { if (player !== mp.players.local) { return; } // garage clean up for (const garage of garageData) { // unload the texture mp.game.graphics.setStreamedTextureDictAsNoLongerNeeded(garage.textureDict); // remove blip if (garage.blip) { garage.blip.resetInfo(); garage.blip.destroy(); } } // sea race clean up // unload the texture mp.game.graphics.setStreamedTextureDictAsNoLongerNeeded("spsearaces"); // remove blips for (const race of seaRaceData) { if (race.blip) { race.blip.resetInfo(); race.blip.destroy(); } } } // register event handlers mp.events.add({ "playerReady": onLocalPlayerReady, "playerQuit": onLocalPlayerQuit });
Credits
glitchdetector - for their research
Source code is also available on GitHub: https://github.com/root-cause/ragemp-blip-info
171 downloads
(1 review)0 comments
Submitted
-
mp.game.data
By rootcause
This resource adds wrappers for these natives:
GET_TATTOO_SHOP_DLC_ITEM_DATA GET_SHOP_PED_COMPONENT GET_SHOP_PED_PROP GET_DLC_WEAPON_DATA GET_DLC_WEAPON_COMPONENT_DATA GET_PED_HEAD_BLEND_DATA GET_WEAPON_HUD_STATS GET_WEAPON_COMPONENT_HUD_STATS GET_DLC_VEHICLE_DATA GET_SHOP_PED_OUTFIT GET_SHOP_PED_OUTFIT_PROP_VARIANT GET_SHOP_PED_OUTFIT_COMPONENT_VARIANT Before 1.1.0, you couldn't use these natives because they needed pointers to their respective structures but since 1.1 allows developers to use ArrayBuffers, that is no longer a problem. Thing is, you still need to create a buffer, invoke the native and read the data from your buffer. (too much work)
This resource is made to prevent that.
Installing
Put gamedata into your server's client_packages directory, then add require('gamedata'); to client_packages/index.js.
Clientside API
This resource extends "mp.game" by adding a "data" object that contains multiple functions.
/* Returns information about a decoration/tattoo. characterType: * 0 = Michael * 1 = Franklin * 2 = Trevor * 3 = MPMale * 4 = MPFemale decorationIndex: * Decoration/tattoo index between 0 and GET_NUM_TATTOO_SHOP_DLC_ITEMS(characterType). Returned object: * { lockHash, id, collection, preset, cost, eFacing, updateGroup, textLabel } This native was researched & documented by TomGrobbe. (https://github.com/TomGrobbe) */ mp.game.data.getTattooShopDlcItemData(characterType, decorationIndex); /* Returns information about a clothing item. componentHash: * Obtained by GET_HASH_NAME_FOR_COMPONENT. Returned object: * { lockHash, uniqueNameHash, locate, drawableIndex, textureIndex, cost, eCompType, eShopEnum, eCharacter, textLabel } */ mp.game.data.getShopPedComponent(componentHash); /* Returns information about a clothing item. (prop) propHash: * Obtained by GET_HASH_NAME_FOR_PROP. Returned object: * { lockHash, uniqueNameHash, locate, propIndex, textureIndex, cost, eAnchorPoint, eShopEnum, eCharacter, textLabel } */ mp.game.data.getShopPedProp(propHash); /* Returns information about a ped's headblend data. entityOrHandle: * Entity (mp.players.local) or handle (mp.players.local.handle) of the ped you want to get headblend data of. Returned object: * { shapeFirstId, shapeSecondId, shapeThirdId, skinFirstId, skinSecondId, skinThirdId, shapeMix, skinMix, thirdMix, isParent } */ mp.game.data.getPedHeadBlendData(entityOrHandle); /* Returns information about a weapon's HUD stats. weaponHash: * Hash of the weapon you want to get HUD stats of. Returned object: * { hudDamage, hudSpeed, hudCapacity, hudAccuracy, hudRange } */ mp.game.data.getWeaponHudStats(weaponHash); /* Returns information about a weapon component's HUD stats. componentHash: * Hash of the weapon component you want to get HUD stats of. Returned object: * { hudDamage, hudSpeed, hudCapacity, hudAccuracy, hudRange } */ mp.game.data.getWeaponComponentHudStats(componentHash); /* Returns information about a DLC weapon. dlcWeaponIndex: * DLC weapon index between 0 - GET_NUM_DLC_WEAPONS(). Returned object: * { lockHash, weaponHash, id, cost, ammoCost, ammoType, defaultClipSize, textLabel, weaponDesc, weaponTT, weaponUppercase } */ mp.game.data.getDlcWeaponData(dlcWeaponIndex); /* Returns information about a DLC weapon's component. dlcWeaponIndex: * DLC weapon index between 0 - GET_NUM_DLC_WEAPONS(). dlcWeaponComponentIndex: * DLC weapon component index between 0 - GET_NUM_DLC_WEAPON_COMPONENTS(dlcWeaponIndex). Returned object: * { attachBone, isDefault, lockHash, componentHash, id, cost, textLabel, componentDesc } */ mp.game.data.getDlcWeaponComponentData(dlcWeaponIndex, dlcWeaponComponentIndex); /* Returns information about a DLC vehicle. dlcVehicleIndex: * DLC vehicle index between 0 - GET_NUM_DLC_VEHICLES(). Returned object: * { lockHash, modelHash, cost } */ mp.game.data.getDlcVehicleData(dlcVehicleIndex); /* Returns information about an outfit. outfitHash: * uniqueNameHash of the outfit. Returned object: * { lockHash, uniqueNameHash, cost, numProps, numComponents, eShopEnum, eCharacter, textLabel } */ mp.game.data.getShopPedOutfit(outfitHash); /* Returns information about an outfit's component. outfitHash: * uniqueNameHash of the outfit. componentIndex: * index of the outfit's component. Returned object: * { uniqueNameHash, enumValue, eCompType } */ mp.game.data.getShopPedOutfitComponentVariant(outfitHash, componentIndex); /* Returns information about an outfit's prop. outfitHash: * uniqueNameHash of the outfit. propIndex: * index of the outfit's prop. Returned object: * { uniqueNameHash, enumValue, eAnchorPoint } */ mp.game.data.getShopPedOutfitPropVariant(outfitHash, propIndex);
Example Script
Writes bunch of information to the console. (which you can access by pressing F11)
mp.keys.bind(0x75, false, () => { // First freemode male tattoo const tattooData = mp.game.data.getTattooShopDlcItemData(3, 0); if (tattooData) { mp.console.logInfo(`Tattoo data: ${JSON.stringify(tattooData)}`); } // Player's top const component = 11; const componentHash = mp.game.invoke("0x0368B3A838070348", mp.players.local.handle, component, mp.players.local.getDrawableVariation(component), mp.players.local.getTextureVariation(component)); const topData = mp.game.data.getShopPedComponent(componentHash); if (topData) { mp.console.logInfo(`Top data: ${JSON.stringify(topData)}`); } // Player's hat const prop = 0; const propHash = mp.game.invoke("0x5D6160275CAEC8DD", mp.players.local.handle, prop, mp.players.local.getPropIndex(prop), mp.players.local.getPropTextureIndex(prop)); const hatData = mp.game.data.getShopPedProp(propHash); if (hatData) { mp.console.logInfo(`Hat data: ${JSON.stringify(hatData)}`); } // Headblend mp.players.local.setHeadBlendData(21, 2, 0, 21, 2, 0, 0.75, 0.5, 0.0, false); const blendData = mp.game.data.getPedHeadBlendData(mp.players.local.handle); if (blendData) { mp.console.logInfo(`Headblend data: ${JSON.stringify(blendData)}`); } // Current weapon HUD stats const weaponData = mp.game.data.getWeaponHudStats(mp.players.local.weapon); if (weaponData) { mp.console.logInfo(`Current weapon HUD stats: ${JSON.stringify(weaponData)}`); } // COMPONENT_AT_MUZZLE_04 HUD stats const componentData = mp.game.data.getWeaponComponentHudStats(mp.game.joaat("COMPONENT_AT_MUZZLE_04")); if (componentData) { mp.console.logInfo(`Component HUD stats: ${JSON.stringify(componentData)}`); } // DLC weapon data const dlcWeaponIndex = 7; const dlcWeaponData = mp.game.data.getDlcWeaponData(dlcWeaponIndex); if (dlcWeaponData) { mp.console.logInfo(`DLC weapon data: ${JSON.stringify(dlcWeaponData)}`); // First component of weapon const dlcWeaponCompData = mp.game.data.getDlcWeaponComponentData(dlcWeaponIndex, 0); if (dlcWeaponCompData) { mp.console.logInfo(`DLC weapon first component data: ${JSON.stringify(dlcWeaponCompData)}`); } } // DLC vehicle data const dlcVehicleIndex = 21; const dlcVehicleData = mp.game.data.getDlcVehicleData(dlcVehicleIndex); if (dlcVehicleData) { mp.console.logInfo(`DLC vehicle data: ${JSON.stringify(dlcVehicleData)}`); } // Outfit data const outfitHash = mp.game.joaat("DLC_MP_SUM24_M_OUTFIT_0"); // Pizza This... Outfit const outfitData = mp.game.data.getShopPedOutfit(outfitHash); if (outfitData) { mp.console.logInfo(`Outfit data: ${JSON.stringify(outfitData)}`); // First component of outfit if (outfitData.numComponents > 0) { const outfitComponentData = mp.game.data.getShopPedOutfitComponentVariant(outfitHash, 0); if (outfitComponentData) { mp.console.logInfo(`First component of outfit: ${JSON.stringify(outfitComponentData)}`); } } // First prop of outfit if (outfitData.numProps > 0) { const outfitPropData = mp.game.data.getShopPedOutfitPropVariant(outfitHash, 0); if (outfitPropData) { mp.console.logInfo(`First prop of outfit: ${JSON.stringify(outfitPropData)}`); } } } });
Notes
If mp.game.invoke fails (trying to get non-DLC item data/invalid params etc.), return value of the function will be null. Most non-DLC items (core GTAV weapons like Pistol, Assault Rifle etc, initial freemode tattoos, initial freemode clothes) are not supported by the natives. Strings returned by the functions (textLabel, componentDesc etc.) are GXT entries. You're supposed to use them with getLabelText or GXT::get.479 downloads
(2 reviews)0 comments
Updated
-

Currency API
By rootcause
This resource provides a currency API to server developers.
This resource will not save anything on its own. I'd also recommend you to not have over 2 billion of any currency.
Installing
Put the files you downloaded in their respective places Check the documentation and examples All done
Currency API
const currencyAPI = require("../currency-api");
/** * Adds a currency to the system. * @param {String} key Currency identifier. (such as vip_tokens) * @param {String} name Currency's human readable name. (such as VIP Tokens) * @param {Number} syncType Sharing type of the currency. (0 = not shared with clients, 1 = shared with everyone, 2 = shared with just the wallet owner) * @return {Object} The added currency object. * @fires currencyDefined */ currencyAPI.addCurrency(key, name, syncType); /** * Returns whether the specified key is a registered currency or not. * @param {String} key Currency identifier. * @return {Boolean} */ currencyAPI.hasCurrency(key); /** * Returns the specified currency's object. * @param {String} key Currency identifier. * @return {?Object} The currency object, will be undefined if the key isn't registered. */ currencyAPI.getCurrency(key); /** * Returns an iterator of all registered currency identifiers. * @return {Iterator.<String>} */ currencyAPI.getAllCurrencies(); /** * Returns the human readable name of the specified currency. * @param {String} key Currency identifier. * @return {String} Human readable name, will be "Invalid Currency" if the key isn't registered. */ currencyAPI.getCurrencyName(key); /** * Returns the sync type of the specified currency. * @param {String} key Currency identifier. * @return {Number} Sync type of the currency. (0 = not shared with clients, 1 = shared with everyone, 2 = shared with just the wallet owner) */ currencyAPI.getCurrencySyncType(key); /** * Returns the sync key of the specified currency. Sync key is used with player.setVariable() * @param {String} key Currency identifier. * @return {?String} Sync key of the currency, will be null if the key isn't registered. */ currencyAPI.getCurrencySyncKey(key);
Currency API Events
/** * currencyDefined * This event is called when a currency is added to the system with currencyAPI.addCurrency * @param {String} key Currency identifier. * @param {String} name Human readable name of the currency. * @param {Number} syncType Sharing type of the currency. (0 = not shared with clients, 1 = shared with everyone, 2 = shared with just the wallet owner) * @param {String} syncKey If the currency is shared, this string will be used with player.setVariable() or player.setOwnVariable() to transfer data to clientside. */ currencyAPI.on("currencyDefined", (key, name, syncType, syncKey) => { // Your code here }); /** * walletReplaced * This event is called when a player's wallet object gets replaced by player.setWallet() * @param {Player} player The player who had a wallet change. * @param {Object} oldWallet Old wallet object of the player. * @param {Object} newWallet New wallet object of the player. */ currencyAPI.on("walletReplaced", (player, oldWallet, newWallet) => { // Your code here }); /** * currencyUpdated * This event is called when a player's wallet has a currency change. * @param {Player} player The player who had a currency change. * @param {String} currencyKey Currency identifier. * @param {Number} oldAmount The player's old amount of currency. * @param {Number} newAmount The player's new amount of currency. * @param {String} source Name of the function that triggered this update, will either be "setCurrency" or "changeCurrency". */ currencyAPI.on("currencyUpdated", (player, currencyKey, oldAmount, newAmount, source) => { // Your code here });
Player API
/** * Returns the wallet object of the player. * @return {Object} */ player.getWallet(); /** * Replaces the wallet object of the player with the specified one. * @param {Object} newWallet * @return {Boolean} True if successful, false otherwise. * @fires walletReplaced */ player.setWallet(newWallet); /** * Returns the amount of specified currency the player has in their wallet. * @param {String} currencyKey Currency identifier. * @return {Number} */ player.getCurrency(currencyKey); /** * Sets the amount of specified currency the player has in their wallet. * @param {String} currencyKey Currency identifier. * @param {Number} newAmount New amount of specified currency. * @return {Boolean} True if successful, false otherwise. * @fires currencyUpdated */ player.setCurrency(currencyKey, newAmount); /** * Changes the amount of specified currency the player has in their wallet by specified amount. * @param {String} currencyKey Currency identifier. * @param {Number} amount * @return {Boolean} True if successful, false otherwise. */ player.changeCurrency(currencyKey, amount);
Examples
Full Test Script, will update GTAV money hud if you give yourself "cash" currency. (Used during development)
// SERVERSIDE CODE const currencyAPI = require("../currency-api"); const SYNC_TYPE_NONE = 0; const SYNC_TYPE_EVERYONE = 1; const SYNC_TYPE_PLAYER = 2; // Events currencyAPI.on("currencyDefined", (key, name, syncType, syncKey) => { const syncTypes = ["none", "everyone", "player"]; console.log(`Currency defined, key: ${key} | name: ${name} | syncType: ${syncTypes[syncType]} | syncKey: ${syncKey}`); }); currencyAPI.on("walletReplaced", (player, oldWallet, newWallet) => { console.log("=============================="); console.log(`${player.name} had their wallet replaced.`); console.log(`Old wallet currencies: ${Object.keys(oldWallet).join(",")}`); console.log(`New wallet currencies: ${Object.keys(newWallet).join(",")}`); console.log("=============================="); }); currencyAPI.on("currencyUpdated", (player, currencyKey, oldAmount, newAmount, source) => { const diff = newAmount - oldAmount; console.log(`${player.name} ${diff < 0 ? "lost" : "got"} ${Math.abs(diff)} ${currencyAPI.getCurrencyName(currencyKey)} (${currencyKey}). (caused by: ${source})`); }); // Register currencies currencyAPI.addCurrency("cash", "Money", SYNC_TYPE_PLAYER); // So that we can use currency_cash shared variable on clientside currencyAPI.addCurrency("vip_tokens", "VIP Currency", SYNC_TYPE_NONE); // Test commands const fs = require("fs"); const path = require("path"); // Do /savewallet to save your wallet to a JSON file. (file path will be printed to console) mp.events.addCommand("savewallet", (player) => { const saveDir = path.join(__dirname, "wallets"); if (!fs.existsSync(saveDir)) fs.mkdirSync(saveDir); const playerPath = path.join(saveDir, `${player.socialClub}.json`); fs.writeFileSync(playerPath, JSON.stringify(player.getWallet(), null, 2)); player.outputChatBox("Wallet saved."); console.log(`Player ${player.name} saved their wallet. (${playerPath})`); }); // Do /loadwallet to load your wallet from a JSON file. mp.events.addCommand("loadwallet", (player) => { const playerPath = path.join(__dirname, "wallets", `${player.socialClub}.json`); if (fs.existsSync(playerPath)) { player.setWallet(JSON.parse(fs.readFileSync(playerPath))); player.outputChatBox("Wallet loaded."); } else { player.outputChatBox("Wallet file not found."); } }); // Do /mytokens to see your VIP tokens currency amount. mp.events.addCommand("mytokens", (player) => { player.outputChatBox(`Your VIP tokens: ${player.getCurrency("vip_tokens")}`); }); // Do /wallet to list the currencies you have. mp.events.addCommand("wallet", (player) => { const wallet = player.getWallet(); player.outputChatBox("Your wallet:"); for (const [key, value] of Object.entries(wallet)) player.outputChatBox(`${currencyAPI.getCurrencyName(key)}: ${value}`); }); // Do /setcurrency [key] [amount] to set your currency amount. mp.events.addCommand("setcurrency", (player, _, currencyKey, amount) => { amount = Number(amount); if (player.setCurrency(currencyKey, amount)) { player.outputChatBox(`Set ${currencyAPI.getCurrencyName(currencyKey)} (${currencyKey}) to ${amount}.`); } else { player.outputChatBox("Failed to set currency."); } }); // Do /changecurrency [key] [amount] to change your currency amount by specified value. mp.events.addCommand("changecurrency", (player, _, currencyKey, amount) => { amount = Number(amount); if (player.changeCurrency(currencyKey, amount)) { player.outputChatBox(`${currencyAPI.getCurrencyName(currencyKey)} (${currencyKey}) changed by ${amount}.`); } else { player.outputChatBox("Failed to change currency."); } }); // Do /currencies to get all registered currency identifiers and their names. mp.events.addCommand("currencies", (player) => { for (const key of currencyAPI.getAllCurrencies()) { player.outputChatBox(`${key} - Name: ${currencyAPI.getCurrencyName(key)}`); } }); // CLIENTSIDE CODE mp.events.addDataHandler("currency_cash", (entity, value) => { if (entity.handle === mp.players.local.handle) { mp.game.stats.statSetInt(mp.game.joaat("SP0_TOTAL_CASH"), value, false); mp.gui.chat.push(`(clientside) currency_cash updated, new value: ${value}`); } }); Source code is available on GitHub in case you don't want to download: https://github.com/root-cause/ragemp-currency-api
Thanks to Lorc for providing the resource icon: https://game-icons.net/1x1/lorc/cash.html
1513 downloads
(5 reviews)0 comments
Updated
-

Interactive CEF wheel
By -Andreas
This resource allows you to setup interactive wheels with actions hooked to the slices presented in the pie - all from server-side. Once you have it ready you can display it to the player. It is made possible using the wheelnav.js library by Software Tailoring that eases development of interactive wheels and are highly customizable. I wrote a C# wrapper to control when to display the wheel and hooked server-side actions to each slice in the wheel. This was initially created as a feature for a larger gamemode that will become available at my GitHub later.
My idea was to have one primary wheel from where subwheels could spring from. It is not necessary to create subwheels, but you can simply fill it with slices with actions hooked. The wheel will automatically close and destroy itself when the user releases the designated key that you supply when instantiating the primary wheel. Oh.. and the system also supports icons for the wheels. There's a lot free to use by wheelnav.js but you can also add your own. See the source-code to see how.
How to install
To get started move the GenericWheel-Client folder to your client_packages and ensure you have included the GenericWheel-Client/js/index.js in your own index.js. You'd probably also need to include the server-side files in your namespace.
How to use
1) We first have to instantiate our primary wheel, and we supply it with id 0. The id will be used by subwheels to reference which wheel they will return to.
var wheel = new PrimaryInteractionWheel(0, "My wheel", keyToBind: "c"); 2) Next, create a subwheel by instantiating an InteractionWheel. We then add this subwheel to the list of subwheels on our primary wheel. The primary wheel now knows of the subwheel and will be able to navigate to it.
var extraWheel = new InteractionWheel(1, "Walkingstyle"); wheel.AddSubWheel(extraWheel); 3) Now that we have our primary and subwheel set up we will create two slices for our primary wheel. One will be a simple action slice that takes an Action which will be invoked if the user clicks on the slice. The other slice is used to open subwheels. We supply that slice with the id of our subwheel.
var slices = new List<object>() { new WheelSliceAction("icon.play", () => player.SendChatMessage("You pressed on a play icon slice")), new WheelSliceSubMenu("icon.list", extraWheel.ID) }; wheel.Slices = slices; 4) We will now add a few slices to our subwheel. Notice that we also add a WheelSliceSubMenu to our subwheel itself in order to give the user the opportunity to navigate back to our primary wheel.
var extraSlices = new List<object>() { new WheelSliceAction("Normal", () => player.SetSharedData("walkingStyle", "Normal")), new WheelSliceAction("Brave", () => player.SetSharedData("walkingStyle", "Brave")), }; extraSlices.Add(new WheelSliceSubMenu("icon.arrowleft", wheel.ID)); extraWheel.Slices = extraSlices; 5) Finally we just need to call the display method of our primary wheel to show the user our wheel.
wheel.Display(player);
Demonstration
There's a video demonstration on the GitHub readme for the project.
The source code is available at Github https://github.com/Andreas1331/ragemp-wheelnav
187 downloads
(2 reviews)0 comments
Submitted
-
Improved Commands
By rootcause
This resource adds a very flexible command handler for serverside JavaScript.
Installing
Drag and drop the improved-commands folder to your server-files/packages/ folder.
NOTE: The archive also contains a folder named improved-commands-example, it's an example resource so don't install it along with the library.
Features
Command aliases Capture command requests (and cancel them if you want to) Somewhat customizable command not found message (like serverside C#) beforeRun property that lets you do final checks before a command actually runs (see example)
API
Instead of extending the global mp object, I've decided to export CommandEvents and CommandRegistry objects. You can access to the library by doing:
const { CommandEvents, CommandRegistry } = require("../improved-commands");
API Properties
/** * This property is used to toggle the "command not found" message feature. * Default value: false */ CommandRegistry.notFoundMessageEnabled; // get CommandRegistry.notFoundMessageEnabled = bool; // set /** * This property is used to set the "command not found" message. * Default value: "SERVER: Command not found." */ CommandRegistry.notFoundMessage; // get CommandRegistry.notFoundMessage = string; // set
API Functions
/** * Adds a command to the registry. * The command object must contain "name" (string) and "run" (function) properties at the very least. * Optionally, the command object can have "aliases" (array of strings) and "beforeRun" (function, needs to return true for further execution) properties. * Other properties will be collected into an "extra" (object) property, which is useful for storing data on commands. */ CommandRegistry.add(command); /** * Returns all command names, aliases not included. * @return {string[]} */ CommandRegistry.getNames(); /** * Returns all command names with aliases. * @return {string[]} */ CommandRegistry.getNamesWithAliases(); /** * Returns the command object for the specified command name/alias. * @param {string} commandName * @return {Object|undefined} Will be undefined if there is no command with the given name/alias. */ CommandRegistry.find(commandName);
Events
/** * receive * This event is emitted when a player tries to run a command. * @param {mp.Player} player The player who is trying to use the command. * @param {Object} command The command object. * @param {string} fullText All arguments that will be passed to the command, as one string. * @param {string[]} commandArgs All arguments that will be passed to the command. * @param {Object} cancel Whether the execution should be cancelled. Set this object's cancel property to true to stop further processing of the command. */ CommandEvents.on("receive", function (player, command, fullText, commandArgs, cancel) { // your code }); /** * fail * This event is emitted when an error is thrown during command execution. * @param {mp.Player} player The player whose command execution failed. * @param {Object} command The command object. * @param {string} fullText All arguments that were be passed to the command, as one string. * @param {string[]} commandArgs All arguments that were be passed to the command. * @param {Error} error The error that was thrown during command execution. */ CommandEvents.on("fail", function (player, command, fullText, commandArgs, error) { // your code });
Example
const { CommandEvents, CommandRegistry } = require("../improved-commands"); // Should we inform the player when they enter an invalid command? Probably... // Note that commands added with mp.events.addCommand aren't known by this resource so they'll trigger the not found message // This is disabled by default CommandRegistry.notFoundMessageEnabled = true; // Events // Example: Players can't use commands in a vehicle CommandEvents.on("receive", function (player, command, fullText, commandArgs, cancel) { if (player.vehicle) { player.outputChatBox("You cannot use commands in a vehicle."); cancel.cancel = true; } }); // Example: Send a message to the player and print the error to the console on execution failure CommandEvents.on("fail", function (player, command, fullText, commandArgs, error) { player.outputChatBox(`Failed to run command "${command.name}".`); console.error(error.stack || error); }); // Commands // Example: /argtest lorem ipsum dolor sit amet -> results in "You wrote: lorem ipsum dolor sit amet" CommandRegistry.add({ name: "argtest", aliases: ["echo", "combineargs"], beforeRun: function (player, fullText) { if (fullText.length === 0) { player.outputChatBox("No arguments provided."); return false; } return true; }, run: function (player, fullText) { player.outputChatBox(`You wrote: ${fullText}`); } }); // Example: /freemode_male_only -> will only work when player's model is mp_m_freemode_01 CommandRegistry.add({ name: "freemode_male_only", beforeRun: function (player) { return player.model === mp.joaat("mp_m_freemode_01"); }, run: function (player) { player.outputChatBox("Yes, only freemode male can run this command."); } }); // Example: /boom -> will emit "fail" event CommandRegistry.add({ name: "boom", run: function (player) { throw new Error("error thrown"); } }); // Properties that aren't named "name", "aliases", "beforeRun" or "run" will be collected into the "extra" property // Example: /getweapon weapon_carbinerifle 500 -> will only work when player's adminLevel property value is equal to or higher than cmdAdminLevel extra property CommandRegistry.add({ name: "getweapon", aliases: ["giveweapon"], // You can access this property in handlers by using "this.extra.cmdAdminLevel" if the handlers are regular functions (meaning it doesn't work with arrow functions!) cmdAdminLevel: 5, beforeRun: function (player) { return player.adminLevel >= this.extra.cmdAdminLevel; }, run: function (player, fullText, weaponName, ammo = 9999) { // You can do this in beforeRun as well (see argtest example) if (!weaponName || weaponName.length === 0) { player.outputChatBox("Syntax: /getweapon [name]"); return; } player.giveWeapon(mp.joaat(weaponName), Number(ammo)); player.outputChatBox(`Gave yourself ${weaponName} with ${ammo} ammo.`); } }); // Example: Extra property #2 CommandRegistry.add({ name: "count_runs", // You can access this property in handlers by using "this.extra.timesRan" if the handlers are regular functions (meaning it doesn't work with arrow functions!) timesRan: 0, beforeRun: function (player) { player.outputChatBox(`This command was used ${this.extra.timesRan} time(s).`); return true; }, run: function (player) { this.extra.timesRan++; player.outputChatBox(`Now it's used ${this.extra.timesRan} time(s).`); } }); // Example: List all commands CommandRegistry.add({ name: "commands", aliases: ["cmds"], run: function (player) { const commands = CommandRegistry.getNamesWithAliases(); commands.sort(); player.outputChatBox(`Commands: ${commands.join(", ")}`); } }); // Example: Async beforeRun (v1.1 and above) // Important: You should check if player object is still valid by mp.players.exists(player) after awaiting // sleep function can be found here: https://stackoverflow.com/a/39914235 CommandRegistry.add({ name: "async", beforeRun: async function (player) { // Getting data from slow API await sleep(5000); const result = Math.random() < 0.5; if (result) { player.outputChatBox("You're allowed..."); } else { player.outputChatBox("You're not allowed..."); } return result; }, run: async function (player) { // Getting data from slow API again await sleep(2000); if (Math.random() < 0.5) { player.outputChatBox("You waited for nothing!"); } else { throw new Error("Failed so bad it caused an error"); // should emit fail } } });
Notes
This resource does not know about commands added with mp.events.addCommand or C# commands. Meaning if you're using the command not found message feature, addCommand and C# commands will also result in command not found message. Commands are case insensitive. Also on GitHub: https://github.com/root-cause/ragemp-improved-commands315 downloads
-
.thumb.png.a3b1ef2817611f3f3fdbbdcca095e2af.png)
RageMP-BigData
By noBrain
RageMP-BigData
This plugin was created for experiment and might not be what you are looking for, this is intended to be used for sending big data to clients in chunks to make the size unlimited for the server owners, this will eliminate original rage-mp events limit and will be as fast as them when being used for small data, but i suggest that you use original ones just in case.
This is still experimental and the way it works might change in a future update
GITHUB LINK : https://github.com/safra36/RageMP-BigData
API
for obvious reasons i made this only to go from server-side to client-side and not client-side to server-side, there is a commented code about this and with a bit of knowlegde you can get it to work but it's not recommended since it will basically flood your server if you have many players so stay of it!
Server-Side Functions
/** Send a big data to a player @param player valid muliplayer player object @param eventName the event which is defined on client-side (just a normal event name) @param DataArray It's an array of data like how player.call works, and it supports all types of data (objects, numbers, strings with no effect on the typing!) @callback dataReceived Optional callback triggers when the data is received in full by the client @param retry Optional param which is true by default, pass false to disable auto retry (this will cause the data to be lost, added by request but don't use it!) */ player.callBig(eventName, DataArray, dataReceived, &retry) /** Send a big data to all players @param eventName the event which is defined on client-side (just a normal event name) @param DataArray It's an array of data like how player.call works, and it supports all types of data (objects, numbers, strings with no effect on the typing! */ mp.players.callBig(eventName, DataArray) /** Set a big shared variable on players @param name name of the data @param data any type of data @callback dataReceived Optinal callback triggers when the data is received in full by the client @param retry Optional param which is true by default, pass false to disable auto retry (this will cause the data to be lost, added by request but don't use it!) */ player.setBigVariable(name, data, dataReceived, &retry) /** Get a previously set shared data on the client @param name name of the data */ player.getBigVariable(name) /** Set a big private data on client which is only set on a certain client, access it on server-side with player.privateData[dataName] You can use player.pdata.name instead from 0.0.3 @param name name of the data @param data any type of data @callback dataReceived Optinal callback triggers when the data is received in full by the client @param retry Optional param which is true by default, pass false to disable auto retry (this will cause the data to be lost, added by request but don't use it!) */ player.setPrivateData(name, data, dataReceived, &retry) /** Delete private data on server-side and client-side @param name name of the data */ player.deletePrivateData(name) Server-Side Variables
/** * Setter * Sets private data on client like setPrivateData but without optional retry * Use with try catch, it can only be set if there is no other pending data on the target name (throw error if there is a pending data) */ player.pdata.dataName = value /** * Getter * Get private data which was set, must be used with await since the data may take time to reach client; */ var data = await player.pdata.dataName; Server-Side Events
/** Detemine if a data has been fully received by the client @param player playerObject which has sent this signal @param id Id of the data sending session @param eventName Name of the even you have been called on the client previously using callBig */ mp.events.add('DataSender:End', (player, id, eventName) => {}) /** This will be called when the sent data was failed (there is an auto retry to put the data on player for sure but see this as a notification) @param id Id of the data sending session @param dataName Name of the data you have been set on the client @param errorCode -1 Means the data could not be parsed on client, -2 means there was some data chunks lost on the send proccess */ mp.events.add('DataSender:Failed', (id, dataName, errorCode) => {}) Client-Side Functions
/** Get a shared variable of a player @param name data name that was set on the player */ player.getBigVariable(name) Client-Side Variables
You can get client private data using mp.players.local.privateData[dataName] Client-Side Events
/** Get notified when a shared data get's updated on server-side @param dataName shared data name @param entityId id of the entity which this it's shared data has been updated (currently it's only a player) @param type get type of entity which is updated (player, object, vehicle, ped but currenly it's only player) @param oldData previously set data if it's forst time then it's undefined @param newData the latest data has been set on this name */ mp.events.addBigDataHandler(dataName, (entityId, type, oldData, newData) => {}) /** Get notified when a shared data get's updated on server-side @param dataName private data name @param oldData previously set data if it's forst time then it's undefined @param newData the latest data has been set on this name */ mp.events.addPrivateDataHandler(dataName, (oldData, newData) => {}) Example (BigData Event Sample)
Server-Side
// Big data is an array of rage-mp cloths (something around 15MB of data) and other ones are regular data (can be big data as well) player.callBig('GetBigData', [BigData, 'Some Other Test Arguments', 3]); Client-Side
mp.events.add('GetBigData', (BigJSONData, args1, argg2) => { mp.gui.chat.push(`Data: ${BigJSONData['Tops']['Male']['NONE'][0].name} - Type: ${typeof(BigJSONData)}`); mp.gui.chat.push(`Data: ${args1} - Type: ${typeof(args1)}`); mp.gui.chat.push(`Data: ${argg2} - Type: ${typeof(argg2)}`); }) Results
Benchmark
Well, the time it takes to transfer the data really depends on player network speed, data chunk size and the size of the data it self. For testing, i sent a very big json file contaning all rage-mp clothing with their torsos and names and prices (which i use on server-side my self), the file is something around 15MB, it took something about ~3s to transfer the whole data to the client, this is a beta version of the library but any help is accepted for optimizations.
Installation
Copy all the files to your packages/client-packages Make sure to add the client-side file to your index.js Enjoy! Known Issues
If your data fails and you set a new data which does not fail, the old data is probably gonna replace the new data over retry
110 downloads
-
![More information about "[JS] Clientside Polygons API (Dynamic Colshapes!)"](https://rage.mp/uploads/monthly_2020_11/bg1.thumb.png.c4588d30853313014141bdbee5ee7e96.png)
[JS] Clientside Polygons API (Dynamic Colshapes!)
By n0minal
I recently needed a polygons library like this for my gamemode to define some companies, houses, gangzones and other kind of establishments boundaries, so I decided to create this resource previously based on abmn's zone manager, but the code was terrible and I decided to rewrite my own from scratch and improving the functionality.
Basically you'll be able to create any kind of colshape you want, without worring about combining colshapes to fit your needs, you can just define the points and the height of the shape and it'll be created easily!
You can set boundaries for houses to move furnitures, for companies to accomplish the job, for mountains in hunting animals scripts and anything else your creativity takes you, just use it!
Demos
https://streamable.com/w7l4h6
https://youtu.be/OxSPcVQrWrY
Advantages
The main advantages of using this resource instead of abmn's are:
These polygons are dynamic, you can modify, move, rotate, basically do anything to the polygon vertices array in real time and it'll work instantaneously, updating the collisions with players. This script is way more optimized and lightweight than the other version. You can choose the color for the lines of the polygon and set them visible or not by just modifying the polygon `visible` property. This script supports different kind of heights for detecting collision (eg.: slopes), it's accurate (may not work as you think it should depending on the slope degree and the polygon height), and supports even colshapes for mountains. You can add more vertex at any time you want to existing polygons, by just pushing a new vector3 position to `polygon.vertices` array.
API Functions
/* Creates a new polygon and return it's instance */ mp.polygons.add(vertices: Vector3Mp[], height: number, options = { visible: false, lineColorRGBA: [255,255,255,255], dimension: 0 }): Polygon /* Removes a polygon */ mp.polygons.remove(polygon: Polygon): void /* Check if a polygon exists */ mp.polygons.exists(polygon: Polygon): boolean /* Check if a position is contained within a given polygon */ mp.polygons.isPositionWithinPolygon(position: Vector3Mp, polygon: Polygon): boolean /* Examples */ // Creating a new polygon const polygon = mp.polygons.add([new mp.Vector3(10, 10, 5), new mp.Vector3(15, 15, 5), new mp.vector3(5, 5, 5)], 10, { visible: false, lineColorRGBA: [255,255,255,255], dimension: 0 }); // Set the polygon lines visible polygon.visible = true; // Modifying a polygon height polygon.height = 100; // Modifying a polygon color (RGBA) polygon.lineColorRGBA = [255, 155, 0, 255]; // Modifying a polygon dimension polygon.dimension = 30; /* Events*/ // Event called when player enter a polygon (clientside) mp.events.add('playerEnterPolygon', (polygon) => mp.gui.chat.push(`You entered the polygon ${polygon.id}!`)); // Event called when the local player leaves a polygon (clientside) mp.events.add('playerLeavePolygon', (polygon) => mp.gui.chat.push(`You left the polygon ${polygon.id}.`)); How to install
Download the zip folder Extract it on your clientside folder Require the index file from the polygons folder. Enjoy it!
See you on the next release!
- n0minal
569 downloads
(5 reviews)0 comments
Updated
-

Blood VFX
By rootcause
Requires RAGE Multiplayer 1.1.0 and above.
If you ever played the missions "Grass Roots - Michael" and "Grass Roots - Trevor", you'll remember these missions had special particle effects. This resource allows you to use those particle effects on your server.
Installing
Put BloodVfx.js into your server's client_packages directory, then add require('BloodVfx'); to client_packages/index.js.
API (Clientside)
/* This resource adds "bloodVfxMode" property to the mp.game.graphics object. Blood VFX modes: - VFX_MODE_DEFAULT = 0 - VFX_MODE_ALIEN = 1 - VFX_MODE_CLOWN = 2 - Invalid modes will be treated as VFX_MODE_DEFAULT. */ mp.game.graphics.bloodVfxMode
Example
const KEY_F2 = 0x71; const KEY_F3 = 0x72; const KEY_F4 = 0x73; const VFX_MODE_DEFAULT = 0; const VFX_MODE_ALIEN = 1; const VFX_MODE_CLOWN = 2; // Pressing F2 will enable alien blood VFX. mp.keys.bind(KEY_F2, false, () => { mp.game.graphics.bloodVfxMode = VFX_MODE_ALIEN; }); // Pressing F3 will enable clown blood VFX. mp.keys.bind(KEY_F3, false, () => { mp.game.graphics.bloodVfxMode = VFX_MODE_CLOWN; }); // Pressing F4 will disable active blood VFX. mp.keys.bind(KEY_F4, false, () => { mp.game.graphics.bloodVfxMode = VFX_MODE_DEFAULT; });
Notes
RAGEMP does not disable alien/clown blood VFX between sessions. (might change in the future) Meaning if you're playing on serverA that has clown blood VFX enabled and connect to serverB using the F1 menu, you'll still have clown blood VFX.
Source code is available on GitHub Gist in case you don't want to download: https://gist.github.com/root-cause/49e7b1601d531bb4c8ba18489ff6731c
129 downloads
-

Glowing Players
By rootcause
Requires RAGE Multiplayer 1.1.0 and above.
This resource allows you to apply a glowing effect to players.
Installing
Put the files you downloaded in their respective places Add require('playerglow') to client_packages/index.js All done
API (Serverside)
/** * Sets the glow color of a player. * @param {Number} red * @param {Number} green * @param {Number} blue */ player.setGlowColor(red, green, blue); /** * Gets the glow color of a player. * @return {Object} Glow color, will be null if the player doesn't have one. */ player.getGlowColor(); /** * Disables the glowing effect of a player. */ player.resetGlowColor();
Example
mp.events.addCommand("setglow", (player, _, red, green, blue) => { player.setGlowColor(Number(red), Number(green), Number(blue)); }); mp.events.addCommand("getglow", (player) => { player.outputChatBox(`Current glow color: ${JSON.stringify(player.getGlowColor())}`); }); mp.events.addCommand("resetglow", (player) => { player.resetGlowColor(); });
Notes
The effect is not really noticeable during daytime. If you have glowing players in your stream range and reconnect via F1 menu, their particle effect(s) will stay there until GTAV is restarted. This is because of particle handles being lost during reconnection and since they aren't managed by RAGEMP, they won't get removed.
Source code is available on GitHub in case you don't want to download: https://github.com/root-cause/ragemp-player-glow
171 downloads
(5 reviews)0 comments
Submitted
-
![More information about "[PHP][Discord] Show Player Count directly in Discord"](https://rage.mp/uploads/monthly_2020_10/OnPaste.20201024-155228.thumb.png.e5455b060adf0dd30a804303fab04e63.png)
[PHP][Discord] Show Player Count directly in Discord
By Wdoyle
In this file I will get you started on how you can use Discord to show your current player count.
First step is to create an application at:
https://discord.com/developers/applications
Once created click Bot on the left hand side.
Click "Add Bot" and then "Yes, do it!"
Change your Icon to something more pretty
Click "COPY" underneath "Click to reveal token"
Open the file in the ZIP.
Install PHP composer if not already installed.
Run composer require team-reflex/discord-php
Edit the example_rage.php file and change the "Discord Token here" to the token you copied earlier
Change line 17 IP:PORT to your Server IP and Port
When ready run the file with php -q example_rage.php
This script must always be running for it to appear on the Discord member section. Therefore I would recommend running Linux Screen and running the php -q command then detaching the screen to run it in the background.
The script uses the Discord Heartbeat to keep it active within the list. It will also only poll the server after running the heartbeat 5 times which is every 42 seconds.
To set it up with your Discord server you must do the following:
Take the link you were at to setup your bot - it should look like: https://discord.com/developers/applications/IDHERE/bot
Where it says IDHERE - take it and insert it here: https://discord.com/api/oauth2/authorize?client_id=IDHERE&scope=bot&permissions=1
Once this page loads - select your discord server that you are an admin of.
This will authorize your bot to submit to your server.
To make your bot appear at the top of the list, simply create a new permission role called Server
Give it permission to send messages
Set it a nice colour
Drag it to the top of your list
Go to the User that is now in your Member list showing player details and give the role of the server you just created
Have fun!
546 downloads
-
![More information about "[C#]RAGE:MP Discord Integration"](https://rage.mp/uploads/monthly_2020_07/z5nuqnV.thumb.png.ac9a7d9df3d2c34db3346c7a03414037.png)
[C#]RAGE:MP Discord Integration
By Jer
RAGEMP-DiscordIntegration
This wrapper allows you easily create an instance of a discord bot within your RAGE:MP server.
Features:
1. Send messages to discord from your RAGE:MP Server.
2. Send messages to your RAGE:MP Server from your Discord server.
3. Register specific channel for the bot to listen. (Can be changed during runtime).
3. Remove specific channel for the bot to STOP listening. (Can be changed during runtime).
4. Update bot status on setup and/or during runtime
How to use the wrapper
1. Add the RAGEMP-DiscordIntegration.dll as a reference to your project in visual studio.
2. Make sure to place the three provided Discord.Net.xx.dll into your server/runtime folder.
3. Enjoy))))
How to set up
1. Create a new application on Discord Developers
2. Create a bot.
3. Invite bot to discord server.
4. Use the token from your bot to initialize the bot as shown in the example below.
5. Register/Remove channels from where your bot sends to all players.
Example script.
using GTANetworkAPI; using System; using System.Collections.Generic; using System.Text; public class Yes : Script { public Yes() { NAPI.Util.ConsoleOutput("Loaded: yes"); } [ServerEvent(Event.ResourceStart)] public void OnResourceStart() { Integration.DiscordIntegration.SetUpBotInstance("TOKEN_HERE", "RAGE:MP", Discord.ActivityType.Playing, Discord.UserStatus.DoNotDisturb); } [ServerEvent(Event.ChatMessage)] public async void OnChatMessage(Player player, string strMessage) { string strFormatted = $"[RAGE:MP] {player.Name}: {strMessage}"; await Integration.DiscordIntegration.SendMessage(3897429387492374, strFormatted, true).ConfigureAwait(true); } [Command("registerchannel")] public void RegisterDiscord(Player player, ulong discordChannelID) { bool bSuccess = Integration.DiscordIntegration.RegisterChannelForListenting(discordChannelID); player.SendChatMessage(bSuccess ? "Success" : "No Success"); } [Command("removechannel")] public void RemoveDiscordChannel(Player player, ulong discordChannelID) { bool bSuccess = Integration.DiscordIntegration.RemoveChannelFromListening(discordChannelID); player.SendChatMessage(bSuccess ? "Success" : "No Success"); } [Command("botstatus")] public async void UpdateBotStatusCommand(Player player, string gameName, Discord.ActivityType eActivityType, Discord.UserStatus eUserStatus) { await Integration.DiscordIntegration.UpdateBotStatus(gameName, eActivityType, eUserStatus).ConfigureAwait(true); } } Source code can be found on my github: https://github.com/JeremyEspresso/RAGEMP-DiscordIntegration
Bugs or feature requests and what not. Just open an issue on the github and I will take a look soon™️.
636 downloads
-

Fake Pickups
By rootcause
Requires RAGE Multiplayer 1.1.0 and above.
This resource adds the ability to create classic GTA style pickups we all love.
Installing
Put the files you downloaded in their respective places Add require('fake-pickups') to client_packages/index.js All done
Serverside API
Global mp object extension:
// Properties /* Returns the amount of existing pickups. */ mp.fakePickups.length; // Functions /* Creates a pickup. * model - Model name or hash, such as prop_armour_pickup. * position - Position of the pickup, recommended: mp.Vector3 instance * pickupRange - Collection range of the pickup. * respawnTime - Respawn time of the pickup after collection, values less than 1 will disable respawning of the pickup. * dimension - Dimension of the pickup. */ mp.fakePickups.new(model, position, pickupRange, respawnTime, dimension = 0); /* Returns the pickup instance with specified ID. */ mp.fakePickups.at(id); /* Returns whether a pickup with specified ID exists. */ mp.fakePickups.exists(id); /* Returns an array of existing pickups. */ mp.fakePickups.toArray();
FakePickup class:
// Properties /* ID of the pickup, read only. */ instance.id; /* Model hash of the pickup, read only. */ instance.model; /* Position of the pickup, read only. */ instance.position; /* Collection range of the pickup, read only. */ instance.pickupRange; /* Respawn time of the pickup, can be changed. */ instance.respawnTime; /* Light data of the pickup, read only. */ instance.lightData; /* Whether the pickup is collected, read only. */ instance.isCollected; /* Dimension of the pickup, can be changed. */ instance.dimension; // Functions /* Allows you to set light data of the pickup, argument names should be obvious. If you want to remove the pickup's light, use resetLightData instead of this function with weird values. */ instance.setLightData(red, green, blue, range, intensity, shadow); /* Resets light data of the pickup. */ instance.resetLightData(); /* Respawns the pickup. (if collected) */ instance.respawn(); /* Destroys the pickup. */ instance.destroy();
Events:
/* fakePickupSpawn is called when a pickup's prop is created. (Basically when it's created and respawned) */ mp.events.add("fakePickupSpawn", (pickup) => { // code here }); /* playerCollectFakePickup is called when a player collects a pickup. This event is cancelable. (Check example script) */ mp.events.add("playerCollectFakePickup", (player, pickup, cancel) => { // code here });
Example Script
// setLightData calls are optional and you don't have to use them, just makes the pickups stand out at night time. const moneyPickup = mp.fakePickups.new("ex_prop_exec_cashpile", new mp.Vector3(1571.681, 3163.909, 40.331), 1.0, 5000); moneyPickup.setLightData(114, 204, 114, 2.0, 2.5, 15.0); const healthPickup = mp.fakePickups.new("prop_ld_health_pack", new mp.Vector3(1568.648, 3166.397, 40.331), 1.0, 5000); healthPickup.setLightData(53, 154, 71, 2.0, 2.5, 15.0); const armorPickup = mp.fakePickups.new("prop_armour_pickup", new mp.Vector3(1567.359, 3169.639, 40.331), 1.0, 5000); armorPickup.setLightData(93, 182, 229, 2.0, 2.5, 15.0); const weaponPickup = mp.fakePickups.new("w_mg_combatmg", new mp.Vector3(1569.465, 3172.773, 40.331), 1.0, 5000); weaponPickup.setLightData(255, 133, 85, 2.0, 2.5, 15.0); // You're better off using custom properties with your pickup instance, this code is for testing purposes. mp.events.add("playerCollectFakePickup", (player, pickup, cancel) => { if (pickup === moneyPickup) { player.outputChatBox("You picked up some money."); } else if (pickup === healthPickup) { if (player.health >= 75) { player.outputChatBox("You're just fine, no need to waste a health pack."); // Doing cancel.cancel = true; prevents the pickup from being marked as collected. cancel.cancel = true; return; } player.health = 100; player.outputChatBox("Health refilled."); } else if (pickup === armorPickup) { if (player.armour > 0) { player.outputChatBox("You already have armor."); // Doing cancel.cancel = true; prevents the pickup from being marked as collected. cancel.cancel = true; return; } player.armour = 100; player.outputChatBox("You picked up some armor."); } else if (pickup === weaponPickup) { player.giveWeapon(mp.joaat("weapon_combatmg"), 9999); player.outputChatBox("You picked up Combat MG."); } }); mp.events.add("fakePickupSpawn", (pickup) => { switch (pickup.model) { case mp.joaat("ex_prop_exec_cashpile"): mp.players.broadcast("The money pickup has respawned."); break; case mp.joaat("prop_ld_health_pack"): mp.players.broadcast("The health pickup has respawned."); break; case mp.joaat("prop_armour_pickup"): mp.players.broadcast("The body armor pickup has respawned."); break; case mp.joaat("w_mg_combatmg"): mp.players.broadcast("The Combat MG pickup has respawned."); break; } });
Source code is available on GitHub in case you don't want to download: https://github.com/root-cause/ragemp-fake-pickups
257 downloads
(6 reviews)0 comments
Updated
-

DavWebCreator
By Davidowiz
DavWebCreator
DavWebCreator is a C# class 'library' which provides you the possibility to generate HTML structures with according styles and logic behind each element.
There are already plenty of examples online here: https://DavWebCreator.com
But anyway I will provide you here at least one example 🙂
Compatible with 1.1.0.0
If you want to report a bug or just want some help join my discord: https://discord.gg/JYNDrSh
Preview
Code behind:
[Command("yesno")] public void YesNoDialogExample(Client player) { // Generate the Browser Browser browser = new Browser("YesNoDialog", BrowserType.Custom, BrowserContentAlign.Center, "520px", "100%"); // Create the dialog. (Most of the elements will get a default value) var yesNoDialog = browser.GetYesNoDialog("YES_NO_EXAMPLE", "Character Deletion", "WARNING", "Do you really want to delete your character?", "Yes", "No"); // Customize for example the font size and the margin. yesNoDialog.Card.ContentTitle.FontSize = "30px"; yesNoDialog.Card.Margin = "33% 0 0 0"; // Add to the browser browser.AddYesNoDialog(yesNoDialog); // Finally open the browser for the desire player. browser.OpenBrowser(player); } //This event will be called when a button was clicked. [RemoteEvent("YES_NO_EXAMPLE")] public void YesNoExample(Client player, params object[] args) { if (args == null) return; // This is just a list of reponses. (You can bind for example 3 textboxes to a button and when someone click on that button, all 3 binded textboxes will be in the response, with their hidden values. List<BrowserEventResponse> responses = JsonConvert.DeserializeObject<List<BrowserEventResponse>>(args[0].ToString()); // For some reason we know that a YesNoDialog only gives you one response, because only the clicked button will be returned. BrowserEventResponse buttonResponse = responses[0]; player.SendChatMessage(buttonResponse.Value + " Clicked"); player.SendChatMessage(buttonResponse.HiddenValue + " This is our secret hidden value. e.g. some id"); // Close the browser player.TriggerEvent("CLOSE_BROWSER"); // Do stuff }
Installation
Download the .rar Open the "DavWebCreator_Installation.rar" and open the directory called "DavWebCreator_GetStarted". Open the directory "Server Resources" and Copy and paste the directory "DavWebCreator" in to your"Visual Studio" server project. Go back to the directory called "DavWebCreator_GetStarted". Now open the directory "Client Resources" and Copy and paste the directory "DavWebCreator" in to your "Visual Studio" client project. Your solution should now look like this.
6. Go back to the directory called"DavWebCreator_GetStarted".
7. Now open the directory "Client Frontend" and copy and paste the directory "DavWebCreator" in to your RageMp "client_packages" directory.
This is how it should look now:
Done. Lets start with some examples…
The project stays under the MIT license, feel free to contribute: https://github.com/davidowiz/DavWebBrowser 🙂
Maybe the installation procedure will be improved. But as you all now, time is limited.
Best regards,
Davidowiz
232 downloads
(3 reviews)0 comments
Updated
-

MC-RP Object Editor
By Ahmed
This is a public release of the object editor used on the Mafia City Roleplay server.
Usage client-side:
let obj = mp.objects.new(mp.game.joaat(model), new mp.Vector3(position.x, position.y, position.z)); mp.events.call('objecteditor:start', obj.id); mp.events.add('objecteditor:finish', (objId, pos, rot) => { if(obj.id == objId) { // send pos and rot to server and save or do whatever. return; } });
Github Link: https://github.com/Ahmad45123/ragemp-objecteditor
419 downloads
-
Texture Variation Sync
By rootcause
Requires RAGE Multiplayer 1.1.0 and above.
This resource adds 2 new functions to mp.Object that provides texture variation sync.
If you don't know the purpose of prop texture variations, you should check out GTA Online's stunt maps/props and yacht styles.
Installing
Put the files you downloaded in their respective places Add require('texturevariation') to client_packages/index.js All done
Serverside API
/** * Sets the texture variation of the object. * @param {number} textureVariation Texture variation index. */ object.setTextureVariation(textureVariation); /** * Returns the texture variation of the object. * @return {number} */ object.getTextureVariation();
Example
This snippet was used during development:
const gamerChair = mp.objects.new("gr_prop_highendchair_gr_01a", new mp.Vector3(-425.517, 1123.620, 325.8544)); gamerChair.setTextureVariation(1); mp.events.addCommand("chaircol", (player, colorIndex) => { colorIndex = Number(colorIndex); if (!Number.isInteger(colorIndex)) { player.outputChatBox("Usage: /chaircol [color index]"); return; } gamerChair.setTextureVariation(colorIndex); }); mp.events.addCommand("spawntube", (player, colorIndex) => { colorIndex = Number(colorIndex); if (!Number.isInteger(colorIndex)) { player.outputChatBox("Usage: /spawntube [color index]"); return; } const tube = mp.objects.new("bkr_prop_biker_tube_xxs", player.position); tube.setTextureVariation(colorIndex); });
137 downloads
(3 reviews)0 comments
Submitted
-
.thumb.png.dae6b9e0606157ff1e53377e59d44ede.png)
ZoneManager
By noBrain
RageMP-ZoneManager
A very useful client-side system which let you create four squares or hexagons in any shape like colshapes which support Z axis
GIT REPO
Why i needed something like this
I was creating a traffic system which needed me to be able to check if a guy entered any crossroads and colshapes wasn't the thing i wanted + i wanted to sell farms by their shape and some of them wasn't shaped exaclty foursquare and i needed a little more, so i craeted this script to be able to make those things possible easily.
Features
You can create 4 types of zone which are defined az mp.zones.types in the script. You can loop through your zones and remove them. You can register zones by desired name. You may delete any zone any time. Server-side events also included. It supports Z axis which is still not very clever since it's not a big deal, all i needed was to prevent people to trigger some events from above the ground Have 4 testing functions which let you draw your zone on the map to see how it fits You can now register zones by any vector pointes above 2 Functions (Client-Side)
/* Check if a zone is registered by it's name and it's dimension */ mp.zones.isZoneRegistered(zoneName, dimension) /* Unregister a zone by it's name and dimension */ mp.zones.unRegisterZone(zoneName, dimension) /* Register a zone by a list of vectors, height , zoneName, type, dimension Vectors: an arrayList of vectors depending on the type of the zone you are choosing to create for example if you are creating a 2PointZone all you need is 2 Vectors inside an array which are the starting point and the ending point and you have to pass height as -1 since it's not used in that type of zone if you are creating a 4PointZone you need to have an arrayList of vectors with 4 Vectors inside and height is used this time, same as 4PointZone in 6PointZone you need to pass 6 vectors and the height. Returns ZoneObject (contains name, type, positions, and zone.data [which never used it my self]) */ mp.zones.registerZone(Vectors, height, zoneName, type, dimension) /* Get ZoneObject by it's name and dimension */ mp.zones.getZoneByName(zoneName, dimension) /* Draw a 2PointZone for testing Requires 2 vectors */ mp.zones.drawZoneBy2(startPosition, endPosition) /* Draw a 4PointZone for testing Requires 4 vectors and height */ mp.zones.drawZoneBy4(Vectors, height) /* Draw a 6PointZone for testing Requires 6 vectors and height */ mp.zones.drawZoneBy6(Vectors, height) /* Draw a NPointZone for testing Requires array of vectors and height Unlimited number of points supported by this code */ mp.zones.drawZoneByN(Vectors, height) /* Check whether a point on the map is inside the zone or not */ mp.zones.isPointInZone(point, zoneName, dimension) /* This is a list of registered zone names used for looping through zones */ mp.zones.registered Events (Server-Side/Client-Side)
On client side the player parameter is mostly the local player it self.
/* mp.events.add('ZoneManager_PlayerEnterZone', (player, zoneName) => { //Your Code }) mp.events.add('ZoneManager_PlayerExitZone', (player, zoneName) => { //Your Code }) */ Changelog
4/1/2020 - v0.0.1 - Added support for dimension - Addes support for NPointZone type which let you create zones by any number of points - Changed some functions to support dimensions, if you already used the script you may need to change them - getZoneByName now returns undefined if the zone on the dimension does not exists (this thing existed before but i forgot to mention it before)283 downloads
- Zones
- client-side
- (and 1 more)
(4 reviews)0 comments
Updated
-

Attachment Sync (C#)
By JAYT
Source code : https://github.com/J4YT/RAGE-Multiplayer-Attachment-Sync
C# Attachment sync for RAGE Multiplayer Server and Client.
Equivalent for the Efficient Attachment System made by ragempdev and rootcause
https://rage.mp/files/file/144-efficient-attachment-sync
Credits to DasNiels for the server-side Efficient Attachment Sync C#
https://github.com/DasNiels/EfficientAttachmentSyncCSharp
It has only been tested on RAGE Multiplayer 1.1
494 downloads
- Attachment
- Sync
- (and 3 more)
-
Better Clientside Commands
By rootcause
This resource extends clientside mp.events object to make clientside command handling easier, which means no more splitting strings to use with if/else if or switch/case in playerCommand event
Installing
Put mp-commands into your server's client_packages directory, then add require('mp-commands'); to client_packages/index.js.
Clientside API
/** * Adds a clientside command. * @param {string} name Name of the command. * @param {function} handlerFn Function that will run when the command is used. * @throws {TypeError} name argument must be a string. * @throws {TypeError} handlerFn argument must be a function. * @throws {Error} Command with the given name already exists. */ mp.events.addCommand(name, handlerFn); /** * Returns clientside command names. * @return {string[]} */ mp.events.getCommandNames(); /** * Removes a clientside command. * @param {string} name Name of the command to remove. * @return {boolean} */ mp.events.removeCommand(name); /** * Removes all clientside commands. */ mp.events.removeAllCommands(); /** * (v2.0.0) Adds a console command. * @param {string} name Name of the console command. * @param {function} handlerFn Function that will run when the console command is used. * @throws {TypeError} name argument must be a string. * @throws {TypeError} handlerFn argument must be a function. * @throws {Error} Console command with the given name already exists. */ mp.console.addCommand(name, handlerFn); /** * (v2.0.0) Returns console command names. * @return {string[]} */ mp.console.getCommandNames(); /** * (v2.0.0) Removes a console command. * @param {string} name Name of the console command to remove. * @return {boolean} */ mp.console.removeCommand(name); /** * (v2.0.0) Removes all console commands. */ mp.console.removeAllCommands();
Example
/* Looks like it's serverside code but it's not, updates GTA V's cash display. Usage: /updmoney [amount] */ mp.events.addCommand("updmoney", function (amount) { amount = Number(amount); if (!Number.isInteger(amount)) { mp.gui.chat.push("Invalid amount."); return; } mp.game.stats.statSetInt(mp.game.joaat("SP0_TOTAL_CASH"), amount, false); }); mp.events.addCommand("cmds", function () { mp.gui.chat.push(`Commands: ${mp.events.getCommandNames().join(", ")}`); });
Example (Console)
NOTE: Console is a RAGE Multiplayer 1.1 feature, which means code below won't work on stable/prerelease/0.3.7 branch.
// Write "hat 123 0" to the console and press enter to give yourself a cool helmet. mp.console.addCommand("hat", function (drawable, texture = 0) { drawable = Number(drawable); texture = Number(texture); if (!Number.isInteger(drawable) || !Number.isInteger(texture)) { mp.console.logError("Invalid drawable/texture."); return; } if (drawable < 0) { mp.players.local.clearProp(0); } else { mp.players.local.setPropIndex(0, drawable, texture, true); } }); // Write "cmds" to the console to see available console commands. mp.console.addCommand("cmds", function() { mp.console.logInfo(`Console commands: ${mp.console.getCommandNames().join(", ")}`); });
Notes
I recommend loading mp-commands as the first script in client_packages/index.js so the functions become available in other scripts. Command names are case sensitive.1358 downloads
(4 reviews)0 comments
Updated
-

Efficient Attachment Sync
By ragempdev
Most of the server developers (ones that don't patiently wait for *something large*, though this resource is powerful enough) use their own server-side object attachments implementation that represents some large JSON with all the object and attachment information. This resource lets you cache "static attachments" in the client-side code so thanks to efficient utilization of the shared data it just uses a small shared variable to do the attachment processing without any need to create server-side objects nor send its data.
For example, if you want to attach a specific object to specific ped bone with spefic bone offset and object rotation, this will only use a ~4-8 byte shared variable keeping it accurate. User-made implementations I have seen before usually take ~100 bytes per an object.
API: Client-side
mp.attachmentMngr.register(attachmentId, model, bone, offset, rotation) mp.attachmentMngr.addLocal(attachmentId) (synced!) mp.attachmentMngr.removeLocal(attachmentId) (synced!)
API: Server-side
player.addAttachment(attachmentId, remove) player.hasAttachment(attachmentId)
Example Resource
There's an example resource in /client-packages/epic-attachments folder. It lets you toggle attachments (there are like 30 attachments) using a NativeUI-based menu. Thanks to root for his contributions made to the example resource.
4278 downloads
-
NativeUI Improved
By Kar
Improvements over the previous nativeui:
Added `UIMenuDynamicListItem`. Descriptions are no longer cut off at 99 characters, but now support 99 * 3. `UIMenuListItem` and `UIMenuSliderItem` can now store extra data. Improved description line wrapping. Description caption is now only updated when necessary. Description background is now only updated (recalculated) when necessary. Bettered the position of the left arrow for list items. Added new badges (Sale, Arrows and Voice Icons). Added `Menu.RemoveItem(item: UIMenuItem)`. When binding an item to a menu, automatically add that item if it isn't in the menu items list already. Added `MenuOpen` event when `menu.Visible` is changed. When hovering over the currently selected ListItem's title text, the cursor will be MiddleFinger, just like in the original menus. `GoLeft` and `GoRight` now correctly handles disabled items. Added experimental automated menu pool system (It's a bit effy right now). MENUS ARE NO LONGER SHOWN BY DEFAULT. Added `closeChildren: boolean = false` parameter to `menu.Close()`. An optional parameter specifiing whether or not you want to close all children with the menu. NOTE BRIEFLY:
The description and optimization updates for me saved over 20-30 FPS while a menu is open. You might want to be careful with menu pools right now. I haven't went deep into it but for simple menu pools it works GREAT. `MenuClose` event is NOT emitted when Visible is set to false. This is to allow users to reopen menus at it's same state, for e.g searching through a store. The GitHub will not match the file here. So please download the file from GitHub (dist/index.ts) or compile it yourself.
https://github.com/karscopsandrobbers/RAGEMP-NativeUI
745 downloads
-
Zone API
By rootcause
This resource adds 3 functions to the serverside mp.world object that provides zone name and type information.
Serverside API
/** * Returns the name of the area/zone at specified coords, ignores heights. * @param {object} coords An object with "x" and "y" properties. * @return {string} Zone name. */ mp.world.getNameOfZone2D(coords); /** * Returns the name of the area/zone at specified coords. * @param {object} coords An object with "x", "y" and "z" properties, such as mp.Vector3. * @return {string} Zone name. */ mp.world.getNameOfZone3D(coords); /** * Returns the type of the area/zone at specified coords. * @param {object} coords An object with "x" and "y" properties. * @return {string} Zone type, either "city" or "countryside". */ mp.world.getTypeOfZone(coords);
Example
const coords = new mp.Vector3(1823.961, 4708.14, 42.4991); // Grapeseed Bunker console.log(`Name 2D: ${mp.world.getNameOfZone2D(coords)}`); // Expected output: Grapeseed console.log(`Name 3D: ${mp.world.getNameOfZone3D(coords)}`); // Expected output: Grapeseed console.log(`Zone Type: ${mp.world.getTypeOfZone(coords)}`); // Expected output: countryside
Notes
Available on GitHub: https://github.com/root-cause/ragemp-zone-api N.O.O.S.E area returns Tataviam Mountains instead. There might be other areas with inaccuracies, feel free to share a fix in comments/send a pull request.99 downloads
(3 reviews)0 comments
Updated